Mtb in knoydart


A good day filming – except there was a one hour like a bike section then the heavens opened as we were trying to film and then after a drenched one hour filming I descended and on a simple piece of singletrack I went from hero to zero catapulted face first over the bars. Really hurt my hands and the right one in particular is horrible. 

Could be bad sprain or a fracture so in A&E in fort William waiting to be seen.


Just give me the painkillers

Theatre Thursday: Yeti does the South West (USA)


The landscape of the American southwest is an ethereal place. The cathedral towers, deep canyons, and crushed red dirt produce terrain with endless riding possibilities. One is only limited by his efforts to push further. Pedaling along the sun drenched plateaus and in the shadowed canyons, all while sleeping below the stars in the cool night, you can start to feel displaced from the daily grind. That is until the beer runs low, the skins begins to redden and you head back to civilization to refuel. The deserts of the southwest are like a second home for many mountain bikers, providing a sanctuary in the winter months as an escape from whatever ails.
_

yeticycles.com/excursions/southwest
_

10 reasons you should race your mtb


I should also point out: I SUCK at racing.  I’m a busy guy, I don’t have time to really train, I barely have time to ride every now and again.  I’m distracted in my race focus as I ride road and also SUP and kitesurf. I’m not a naturally-gifted athlete, and I’m carrying an extra 5kg I don’t need.  I’m a slightly better than 70%  racer on a good day.

My HipstaPrint 6


1. It doesn’t have to cost a lot of money, but there are good reasons it sometimes does.

Sure, some races are expensive: I’ve paid as much as £150 for an event registration fee (plus a night in a hotel, gas, food, etc.), but I’ve also paid as little as £5 at a local race I rode.  It’s also important to keep in mind that the expensive races are expensive for a reason (besides just greed – there aren’t many rich MTB race promoters).  Promoters have to buy insurance, swag items, number plates, course marking materials, permits from land owners, and prizes, among many other things.  Most big races are typically manned by volunteers from various local organizations (bike clubs, boy scout troupes, local trail running clubs, etc.), and the promoters make donations back to the those groups as a thank you for their help.


the sweep
Strathpuffer on the non snow and ice side of the hill


2. You can spend all day (or night) enjoying yourself on a bike.

Greg is right that at some races you’re pedaling too hard to look around and enjoy the scenery.  My advice: do an endurance race!  If you’re riding 50+ mile, and you’re like 99% of MTBers, you will not be riding super fast.  Sure, you’re pushing yourself, but if you’re going to survive and make it to the end of race you’ve got to be somewhat conservative, and there’s plenty of time to look around and enjoy where you are.  I’ve even stopped for pictures at races.  I’m nowhere near the front of the group, so why not?

3. You get to ride new places and not worry about navigation.

Exploring is great.  But a lot of times, I just want to ride my bike and shred some singletrack.  Races are a GREAT way to explore trails you’ve never been on without the hassle of stopping to check maps again and again.  Just turn the pedals and enjoy.

Glen finglas 4 More Lads - still no Crawf!

4. You can see tons of new things while preparing for an event.

I like endurance races… have I mentioned that?  Preparing for an endurance race means riding–a lot.  A lot more than you otherwise would.  I don’t know about you, but I can only ride circles around the same trail so many times a month before I need to venture out and try something else.  Also, most of the races I do aren’t local–they’re off somewhere else, which is why I want to go.  It’s really rare that I bother pre-riding a race course, certainly not riding it again and again and again. (i agree ED)


richbike
No helmet – rigid days but that handlebar and that hair seriously??


5. Races give you a guided tour of awesome trails.

Most of the races I’ve been to go out of their way to route the event over some of the best trails in the area.  Avoiding technical areas? Some do maybe, but lots of races use those technical areas as the focal point of the route–it’s why you’re there.  Hundreds of people haven’t flocked to Scotland mid winter to do a 24hr ride for over a decade because of the doubletrack sections –they go for ice over rock garden at the top. If you want to ride your bike all day on fun and/or challenging terrain, there’s plenty of opportunity to do so.


6. You don’t have to be as self reliant.

Self reliance is great, and I’m a big proponent of it.  I carry the tools and supplies to fix almost anything on my bike on pretty much every ride.  Even road rides, I’ve got a pump, a minitool, and a few spare tubes.  But it’s also really nice to ditch some of that stuff and ride all day without carrying the extra crap.  When I go to races, I make sure my bike is in tip-top shape, and since there are aid stations every so often, I’m able to carry less, and I can send supplies ahead to the stations to refuel/top off supplies along the way.  Where else can you ride 65 miles and not have to carry a massive hydration pack? I do always carry the essentials, though (spare tube, multitool, power links, and derailleur hanger all fit in a small saddle bag, and a pump in a jersey pocket). Even if the aid stations are only 10 miles apart, I don’t want to have to walk for miles in bike shoes.

7. Grass Roots Good Times.

Greg’s point about over commercialization is valid to an extent, but at the same time it’s silly to complain about pros decked out in matching kits head to toe when A) they’re paid to do so, and B) plenty of weekend warriors spend their own money do exactly the same thing.  Most MTB races I’ve been to, including the big ones, are super laid back events where everyone is there to have a good time.  Sure, there might be some sponsor logos on the finish line banner and whatnot, but who cares? Those companies probably donated that stuff.

ruthin 03.JPG

8. The time constraints.

Honestly, I don’t have a major counterpoint to this. Races are (sometimes) big events with (sometimes) lots of people–there has to be a schedule, and if you’re participating, you have to adhere to it.  But that doesn’t mean you can’t still explore the town.  I’ve explored towns I would have never been to had it not been for attending a MTB race–ate at great restaurants, explored nearby trails the day before the race, and checked out some cool bike shops.

9. Meet lots of people!

Okay, if you want solitude (and we all do at times), a race is not the place for that.  But at the same time, races present the chance to meet a lot of really cool people.  I’ve shaken hands and chatted with a spanish elite rider sleeping in his belingo van and driven up to do a marathon race in Scotland because the ‘weather is worse’ .  I’ve met people in person I’ve chatted with on forums before.  I’ve seen with my own eyes people do things on bikes I wouldn’t have thought possible. (not just the accidents)


selkirk SPLASH crop
Scotland + SUN – seriously?


10. You’ll realize you suck, and will then get much better.

A few years ago I raced and when I pulled into the first feed station at mile 15 one of the volunteers announced, “In case anyone is wondering, the leaders are about 30 minutes ahead of you.”  WHAT?!?! I didn’t even know I’d been riding for 30 minutes already–it was hard to believe the leaders could be so far ahead already.  It took me a little over 7 hours to cover the 75ish-mile course with over 2300m of climbing–the winner finished in just over 4.5 hours. And once when I raced the 60km course the winner on the 85km course overtook me 10km from the finish.

Attending a race–especially one with pro riders in attendance–you’re guaranteed to get a HUGE slice of humble pie.  For one thing, I routinely get bested by guys several decades older than me.  I want to be those guys when I grow up–it’s motivating to keep at it, keep pushing, keep trying to improve.  Not only that, but having a big event on the calendar is a great motivator to ride as much as possible.  You will get fitter.  You will become a better bike handler.  Youwill get faster.

You might still suck when compared to the guys who get paid to ride, but you’re better than before, and you’ll always know there’s lots of room for improvement.

ruthin 09

Conclusion

Racing is awesome.  It provides an opportunity to ride somewhere you might not get to otherwise, you get support so you don’t have to carry gallons of water and lots of food all day, and it’s a GREAT way to challenge and push yourself.  You’ll learn things out on the course that will help you in all aspects of life–not just riding.  Endurance racing in particular is a great for mental toughness training.  Plus, convince some friends to race with you and you have a fun weekend away with your buddies.

That said, racing should absolutely not be the only reason you ride–if it is, it will take the fun out of mountain biking.  But racing is a great way to compliment and improve your mountain biking life, and add some variety.

Another titanium maker you haven’t heard of (yet)


Matts-Titanium-Stinner-Hardtail-29r-21-1335x890from radavist

Titanium makes for a great off-road material. The tubing diameters are oftentimes larger than steel resulting in a ride quality that’s unprecedented. For Santa Barbara’s Stinner Frameworks, titanium was the next logical material to learn how to tig weld. Their shop now offers titanium road, touring, road and mountain bikes, with Matt’s being one of the recent beasts to be born.

Keeping the Tunnel 29’r frame raw, it’s offset by the razzle-painted Rock Shox Pike fork, Jones wheels, SRAM 1x drivetrain, internally-routed Reverb dropper and a Thomson cockpit.

Matt grew up riding MTBs in Topanga and Calabasas as a kid but hadn’t touched one in over 14 years. This bike will be the catalyst to get him back on the trails in Santa Barbara and hopefully he’ll be shredding with us when he comes home to Los Angeles over the holidays.

For those of you unfamiliar with Matt’s work, he’s the photographer for Stinner Frameworks and goes by the handle @HazardousTaste on Instagram. I highly suggest you give him a follow!

Dream Bike: Velo cult Ahearne Dirt Tourer


Velocult Ahearne
Velocult Ahearne

From RADAVIST

I can’t help it. I love touring bikes with big, fat, high volume tires and funky stances. This project in particular was born from the mind and abilities of three important individuals, residing in the Portland area under the Velo Cult Customs umbrella.

This Ahearne Dirt Tourer is a collaboration between three people: Sky from Velo Cult, Chris Igleheart and Ahearne. We’ll start with the most obvious hand: Chris Igleheart‘s segmented fork, which is complimented by the Ahearne rack and frameset. These bikes are 100% custom, can be built with 26″ or 27.5″ wheels, have an optional upgrade of Honjo 90mm Fenders and are rugged enough for even the toughest dirt touring and bikepacking expeditions. One of my favorite details are the braze-ons hidden below the top tube for a strapless bag install.

This is the first in a series of Velo Cult Customs, the line will grow to include road, randonneur, cross and a gravel racer in the coming months.

Contact Velo Cult for pricing and availability.

Velo-Cult-Ahearne-and-Igleheart-Dirt-Tourer-10-1335x890

Radavist Calendar Pic – NOVEMBER


RAD_NOV2015_Fixed

you are thinking ‘that looks gnarly/fun/stupid/scary’ did they land smoothly – what is with the front wheel angle?

That’s when this happened. Bummer.

Falling on a tandem isn’t fun. It’s also not fun to watch. Luckily no one was severely hurt. Kyle and Robert could both get back and ride without major issue. It was once we stopped moving that joints began to seize up and expectations for me to wrap up the photostory ended.

But hey, you take what you can and tell the story.

Ringtail_Lukens-73

Friday Bike Poster: hermosa creek race poster


Hermosaemail2010

had one of those weeks when work has got in the way of writing anything on this post …. had 2 rides last weekend and a great new mtb tyre ….i will get to it. At the moment my mind is as confused and busy as this poster ….

People ride this for Love and Money


DH at this weekend

Look at the course and these guys are riding the course without anger – crazy.

The mountain bike season concludes this week with the UCI Mountain Bike & Trials World Championships, held in Vallnord-La Massana, Andorra, high among the Pyrenees mountains between Spain and France. Athletes will compete in the disciplines of cross-country Olympic, Eliminator, team relay, downhill and trials for the right to wear the rainbow stripes all through the next season.

The action begins on Tuesday with the Eliminator, a short intense competition, where riders compete four at a time on a 900 metre technically demanding track, with the top-2 of each heat moving on to the next round until only four riders are left to race for the titles for Women and Men.

Bike Packing Weekend – 125km through the cairngorms


Not the best start this ride as the night before Friday had been a night of beer and bento with the lads. Woke up early then drove to Blair Athol

assembled on bike rack

Set off up Glen Tilt and then realised that my spare batteries for the GPS were still on charge at home.

first bridge
first bridge

Only had half a charge but had my OS maps ready with me so off I went through the first wood and spotted my first red deer in the Woods. 20km in and had to stop for recovery food beans and sausage lunch cold but effective hangover cure.

2015-07-25 12.35.43

Headed on and track became muddy and rocky and nearly too narrow for the bike was feeling calorifically low.

path gets rockier and narrow

The valley is obviously used by the RAF for training as a Hercules buzzed me about 80 foot up. More red deer crossing river and bounding up slope opposite – very skittish of humans sign that it must be hunted.

ruin
ruin
selfie
selfie

2015-07-25 14.20.17

Stopped at Glen Tilt ruin where the trail opened onto flood plain valley floor then afterwards headed left over the muddiest moor i have seen in a while. Normal mtb tread just disappeared into gloop but i was fat so did better but still had to get off every 50 foot to cross burns or mud holes.

over falls
over falls

2015-07-25 16.38.20

Crossed makeshift crossing over the river by waterfall and then faced with two deeper river crossing but misjudged depth which came to crotch so shoes were sodden.

The last 2 km to the Bothy screamed down a technical downhill smacked a rock hard and punctured – was going to walk to the bothie but decided to change tube and discovered that the small lezyne pump I had with me unscrewed the valve when I was taking it off – what a pain after 4 mins of huffing and puffing to get the FAT tube pumped up to have it all WOOOSHHHH out.

better roads
better roads – just before e the descent that punctured me

Sunday 5:40 AM woke up in bothy after a good sleep maybe helped by the contribution of the two Edinburgh climbers with either their 2nd hand dope smoke or a rum and Coke I drank.

in bothy
in bothy
morning
morning

Packed and try to inflate me a tyre some more and enjoyed the unscrewing of the valve once again. Decided to divert to Kingussie and the food co-op there to restock on food I haven’t figured that the ride would take so long at a slow 10km/h average.

fern lane
fern lane
Fern Lane
Fern Lane

Cycled out the enjoining valley which was much easier going ( a tip from Fossil cyclist) past 2 fast 29er riders and then later by 2 female mountain bike on their way to Nethy bridge (a long haul for sure)

Finished the ride with a long section of tarmac which felt so slow on the fatbike into Blair Athol – Tired drive home my arse tender and my legs sore.

DAY1
DAY1
DAY2
DAY2

is Wider Better?


On Sunday I hopped down to Glentress taking both my Fat Bike and 29er down the trails.

both in the van
both in the van

Moving from the fat bike with its wide bars back to the 29er i was shocked at how narrow the bars seemed. Took me two runs to feel comfortable – so stopped into the shop armed with a 20% discount and bought some wide Renthal bars and fitted them.

old ones in front new fitted
W I D E
W I D E

I will need to cut them a bit so google and came across this interesting article (BIKERADAR)  on how wide I should be ….

Handlebars have been trending wider for many years. Few of us are riding the 580mm-wide Answer Hyperlite bars that were the rage fifteen years ago, but that doesn’t mean you should rush out and buy a handlebar that’s wider than a Honda Civic just because it’s what your favorite pro downhiller is riding.

If you’re thinking about going wider, do it for function, not fashion. And before doing it at all, weigh the pros and cons.

Specialized fit professor Aaron Post recommends balancing biomechanics with terrain and riding style to find your ideal handlebar width

The Evolution of Wide Bars

Like the rest of the components we ride, handlebars have evolved dramatically since the early days of our sport. In the beginning there were just ‘mountain bikes,’ today we have all manner of species of knobby-tired machines—cross-country, trail, all-mountain, enduro, freeride, downhill—along with components designed specifically for these breeds.

Noel Buckley is the owner of Knolly bikes. He has a background in engineering physics and has seen the mountain bike market diversify over the past two decades. “The changes in riding style, advances in full suspension bike geometry and suspension travel, the rise of new applications (e.g. downhill bikes) have allowed handlebar manufacturers to go wider than the standard cross-country bar of 20 years ago,” said Buckley.

His engineering background lends itself to an analytical view of handlebar width, though he admits there’s no hard science to finding one’s ideal handlebar.

“There are no simple answers here: even making a table of rider height versus frame application versus suggested bar width would be difficult and probably not overly useful. Local factors such as trail design, trees, rocks, and the balance of climbing versus descending might sway a given rider’s preferred bar width by 25-50mm,” said Buckley. “The obvious argument towards using longer handlebars is that they give you more leverage (or torque) to steer the front wheel: this is supposed to make controlling the direction of the bike easier. In general, this is correct. At the end of the day, it is very difficult to say anything more than wider bars = shorter stems, smaller riders = narrower bars, and low and slack bikes can typically get away with wider bars than steep, tall bikes. But even these dogmas are being challenged by the increase of 710-740mm bars in the trail bike market—bar widths that were decidedly DH oriented less than half a decade ago.”

Wider Does Not Necessarily Equal Better

Like most things in life, handlebar width is best approached with an eye towards moderation and practicality. If your trails are very tight, heavily wooded, and lack high-speed sections then a wider a bar may be a hindrance. If your handlebar is so wide that you are riding with your arms extended and your elbows locked you will find it very hard to react to obstacles. Likewise, if you’re slight of frame with narrow shoulders, wider bars may cause discomfort.

Some trails are just not compatible with wide handlebars...:

You shall not pass!

Aaron Post is a fit professor with Specialized. He notes that while there are tangible benefits to going wider, wide bars are not for everyone, and my have little to no benefit, depending on how and where you ride.

“The wider trend has come from riders who are riding very technical, very fast terrain, where the trail is literally starting to pull the bar out of the rider’s hand. If your trails are not particularly technical the need for a wider bar diminishes. More often than not, it is biomechanically easier for a rider to support themselves with a narrower bar, you would want to go wider as the terrain dictates,” said Post.

Post uses push-ups as an example. It is much easier to do a push-up when you hands are placed just to the outside of your shoulders than it is when your arms are splayed out to your sides. Signs that you may have gone too wide include pain or discomfort between the shoulder blades and upper back.

Handlebars, Stems, and the ‘Golden Ratio’

As your handlebar length increases your reach decreases. A wider bar will shift more of your weight forward. Hence the need to run a shorter stem to keep your weight centered.

A wide bar is only half of the equation: a shorter stem is necessary to maintain a consistent reach: a wide bar is only half of the equation: a shorter stem is necessary to maintain a consistent reach

A stubby stem helps to keep your reach relatively consistent when running a wider bar

The general rule of thumb is to maintain a 2:1 ratio of handlebar width to stem length: for every 20mm increase in handlebar length you should reduce your stem length by 10mm. So if you’re running 660mm bars with a 100mm stem and want to try a handlebar that is 700mm wide you will need to pair that 700mm handlebar with an 80mm stem to maintain a relatively consistent position on the bike.

Like most rules of thumb, this is 2:1 ratio is by no means absolute. And, as Post points out, it is only useful if you’re starting from a comfortable fit position. “If you’re already unhappy where you are all bets are off.”

Test Many Times, Measure Twice, Cut Once

It’s important to remember that just because you bought an 800mm-wide handlebar does not mean you’re locked into this length.

“Manufacturers often try to make the bar a bit longer than required to give users the option to shorten it to the correct length. Riders may mistake this extra length as being appropriate for their height, bike setup and riding application,” said Buckley.

Measure twice, cut once, but be sure to experiment with various widths: measure twice, cut once, but be sure to experiment with various widths

Work outward from your existing position to find your ideal width 

It’s easy to experiment with handlebar width, particularly if you are running lock-on grips. With a wider bar installed, mount your controls in the same position they were on your narrower bars and gradually move them outboard until you find a position that’s to your liking. (This may require the use of several different stems, too.)

Monday Bike (distinct lack of) style: blast from the past


a scary photo from my long haired past – steel Marin no suspension 32lbs beast. Cycling over the Black Mountain in the Brecon Beacons with water bottle and no food – cue exhaustion and double vision

Race last …. Last Saturday and tomorrow


last Saturday was the Selkirk mtb marathon – a 80km mtb race in the Scottish Borders. Started well – and I was cycling well – the lynskey 29er rohloff is a beast when it comes to rolling. All was well to the 55km mark when coming through the Innerleithen trails I hint some Flint so hard it punched through the rear tyre (set up tubeless). Stopped and jiggled the wheel trying to get lube to block hole. Big cut about 5mm and it wasn’t sealing but slowed after 5min so pumped up more and carried on…… 400m later it was obvious it wasn’t going to hold so I stopped and changed tyre – got the tube I carry out and fitted it. Pump up and on the bike slowly – took 10 minutes and carry on. Into a drop and Pfffffffff! A puncture.

Now here I was delayed and must have seen 150people pass as I took tube out and tried to wipe the latex off so I could patch it. Bloody hell what a mess – was wiping the tube on the grass on my clothes trying to get it dry.

So I lost 50min at least – carried on feeling how strange the bike handles with tubes in it. If you have never tried tubeless you really should it is so much quicker. I was also riding slower as I didn’t want another puncture, then the gps died.

Still a good race might try find another mtb later in the year.  


A good race but not by the look of my face

  
And the amount of crap – sorry energy supps I consumed …..

 
And here is the Strava summary (well part)


Great ride yesterday …. mtb up the west highland way to Conic Hill


Strava summary
Strava summary

Meetup ride yesterday planned to leave Milngavie at 10am

I had a work call starting at 9am so was going to be late – messaged the guys to start without me and by the time i cycled out they were 15min gone. I will just catch up i thought …. but it took 40min to do so catching up just before the ascent to Conic Hill.

The climb is a beast as always …

now you see us
now you see us
now you don't
now you don’t

Brief lunch looking out over Loch Lomond – then the long haul home.

The best April Fool pranks for cyclists


Just saw a link to this video – I can’t remember the last time I laughed so hard ….

NSMB has created the ultimate guide to April Fools’ Day. With the help from IFHT and the Coastal Crew, we’ve laid out the best pranks for mountain bikers. Featuring classic pranks such as the ball bearing gag and a few you’ve probably never heard of.

Ride in the kilpatrick hills


So the kilpatrick hills are just outside glasgow and I have never been there to walk or ride but the Facebook meetup group were going there today although later so I decided to stop there this morning to have an early ride.

IMG_7152
Road was pretty icy but once on the bike it was great and then I started to climb

IMG_7157
And climb right to top of ridge. The genesis caribou has a 1×10 setup but up top it hits 13% ave gradient (makes note to check on gps track) I was having to sit back and pedal as standing or leaning forward meant the tyres were starting to slip. But sitting down meant the front wheel lifted on every pedal stroke …. I confess to 2 brief halts. Then the top ….

IMG_7162
Nice pretty untouched snow – luckily someone had passed yesterday so I had an indication of where to go – it was all new to me. Fat tyres only sunk in 2-4 inches but when I stepped off it was 6-10 deep ….. Ooooft

IMG_7160
Then the path led down

IMG_7163

By the bottom I was grinning ear to ear.

Screenshot 2015-01-30 14.25.38

How to get fitted – bike – mtb – reblog


from single tracks – a reminder on how to do it …

mountain_bike_fitting

So, you’re planning on purchasing or assembling your dream bike for the upcoming MTB season. What size should you choose? How long of a stem do you need? Should you get a setback seatpost? What’s the right bar width? I’ll try to answer all these questions and more in this article on mountain bike fitting.

Most bike shops do a good job helping customers find the right frame size and you can always double check by taking a peek at the bike manufacturer’s website or catalog. The size chart below is an example and as you can see there is a range for every frame size. Beyond height, this chart doesn’t take into account specific body measurements (torso size, leg length, etc.) and that’s where component fitting comes in.

size-chart

So… it’s really up to you to get the perfect fit. Some bike shops offer fittings, usually at a cost nowadays (not including parts which is an additional cost). But looking at your body and sitting on the bike with someone holding you on, you can get a good idea of what fits or what feels best for you. But before you spend your cash, let’s cover the list of things we can change on the bike, what those changes will feel like, and what a retailer shop should be able to do to accommodate you when you purchase that shiny new bike.

Frame size: #1 most important item

Getting the right frame size is paramount. If you’re in between sizes and are planning on really riding rough, you may want the smaller size rather than the larger (easier to bail when things go wrong). Use a sizing chart to get an idea of where you fit, then check the actual bike. Hop on the bike and if possible, go for a test ride. You should also be able to get a sense of what’s going on with the fit just by sitting on the bike and pedaling backward.

At this point you should feel more or less comfortable: not up too high and stretched or too low and cramped. You should also be able to place your feet flat on the ground when you dismount the bike. Stand over height is a bit more difficult to gauge these days due to the newer, sloping top tube frames which give the illusion that the frame is smaller than it is. Instead, I focus my attention on the top tube length.

To find the right seat tube length, take your inseam (legs 6 inches apart) and multiply by .67 then subtract 4 inches. For example I have a 33 inch inseam. Multiplied by .67 I get 21.75 inches, take 4- 5 inches away I end up with a 17.5 inch frame set (which happens to be what I use).

fitting3fitting1fitting2

MTB handlebar width

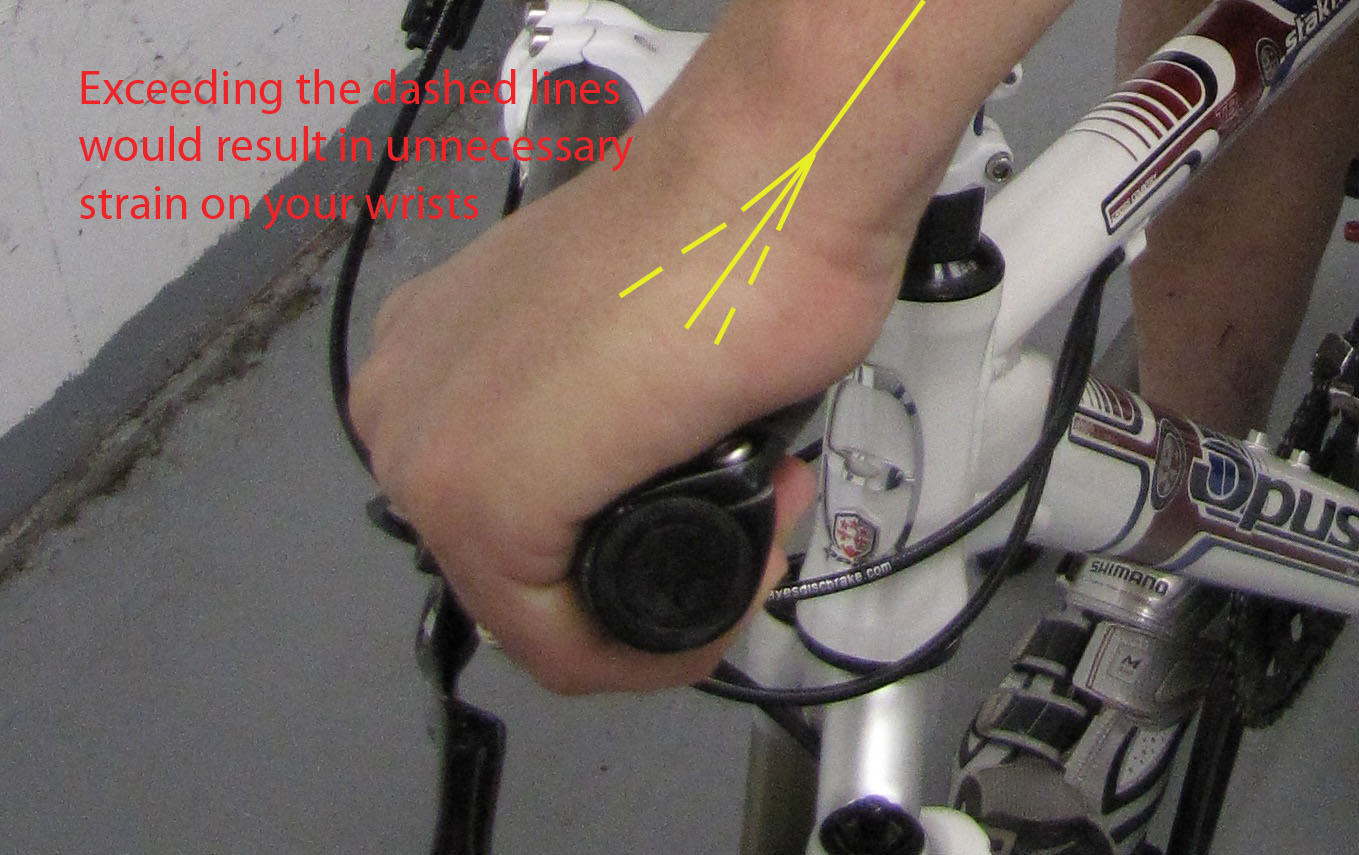
Sometimes due to your specific body type or riding style a wider than stock bar can be a good choice. As the bars widens, it allows more steering torque (great for nasty terrain) and slows your steering down. A bar change on its own will also pull you forward a bit. A wider bar also makes it easier to breathe as it encourages you to open your chest more when huffing up a hill. The good news is that most bike shops are willing to change to a wider bar if necessary. Once you have your bar width, work on shifter and brake positioning. Try to set both so your wrist is not bent in an awkward angle and there is a small degree of freedom there – about 15 degrees. Anything more than that and you are at risk of hurting yourself.

fitting4croped-hand1

Stem length

Riders with disproportionate leg to torso sizes will want to take a look at changing up stem length for a more comfortable riding posture. A longer stem typically pulls the rider forward and flattens the back. The result is slowed steering and more traction to the front wheel.

Shortening the stem moves the rider toward the center of the bike and adds curvature to the back, leading to a more upright riding position. Ideally the rider should have elbows slightly bent when riding straight ahead which acts as a natural upper body shock absorber. Proper stem length and positioning alleviates upper body soreness and removes excessive force from the wrists. Most XC stems range in length from 70mm to 130mm. AM and DH stems can range from as short as 25mm to about 55mm+.

fitting13fitting14

Seat post height and setback

Once you have the right frame size it’s time to set the seat post height and setback (for you folks who ride DH, FR, and DJ this does not apply). Starting with the seat parallel with the ground, set the cranks so that they are in line with your seat tube, projecting a straight line through the BB and to the floor. Hop on the bike and have someone support you while you position your feet on the pedals – ball of the foot on the axle and foot slightly pointing forward a couple degrees. You should not have your leg fully extended – there should be about 10-15 degrees of movement before your leg locks straight.

You can also use this formula as a decent starting point: Take your inseam measurement and multiply by .883. The result is the ballpark measurement from the top of the lower pedal to the top of the saddle. From here you may need to go up or down a quarter of an inch until it looks and feels right.

fitting7fitting6

With the basic seat height position set, it’s time to check positioning front to back. With the cranks set at 3 and 9 o’clock, get a piece of string and tie a weight to it. Sit on the bike in your riding position and pedal backwards a few strokes and stop at 3 and 9 o’clock again (you’ll need a spotter to help). Hang the weighted string from the bony protrusion just below your knee cap and have a look at where the string intersects your crank – it should fall right at the pedal axle. If the string falls forward or behind, just slide the seat on the post to fix your positioning.

If you can’t adjust the seat far enough you may need to change your seatpost offset. There are seatpost offset options you can purchase from zero offsets all the way to 25mm offsets (see images below).

fitting15fitting16

Handlebar height 

You may find that your handlebars are too low or high. By adjusting bar height you’re trying to achieve:

  • A comfortable back angle, depending on your degree of flexibility.
  • A natural feel to look ahead without craning your neck.

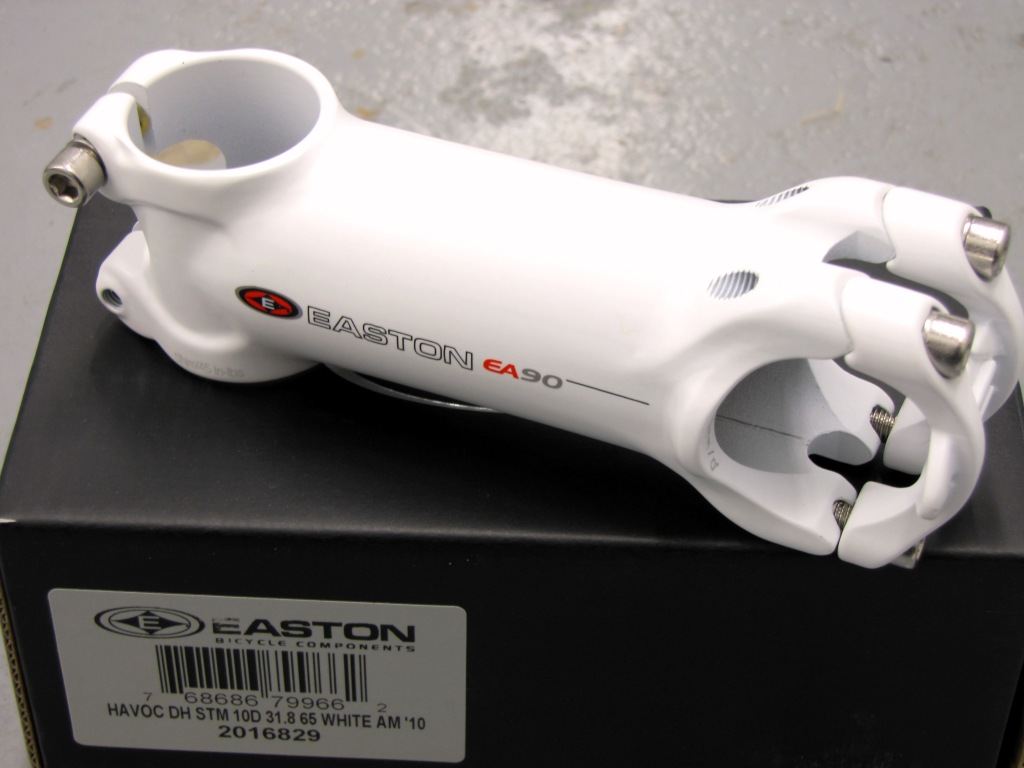
There are a few solutions here. Firstly take a look at where your stem meets your steering tube. You may see a few spacers – if so great! You can adjust the shim stack position relative to the frame which will raise or lower the stem and bar. For example, placing all the shims below the stem will raise your bar up by that amount. If you don’t have shims, you may need to get either a riser bar or a riser stem. Easton sells the EA50 stem with either 6 or 20 degrees of rise. You can also choose from flat bars, mid rise bars (about 20mm), or full rise bars (from 35mm to 45mm depending on the model).

Crank arm length 

You may want to consider changing up your crank arm length as well. Most manufacturers offer MTB cranks from 165mm to 180mm, usually in 5mm increments. The proper crank arm length is typically dependent on the rider’s height and inseam. So a short person (5′ – 5′.5″) may want to consider 165- 170mm cranks. For someone from 5′.5″ – 5′ 10″, a 175mm usually works well and taller folks may want to consider 175mm+ cranks. Now if you have short legs, a shorter crank arm may be a better choice. Or if you’re a quick peddler, a shorter crank arm may be the way to go as well.

COMFORT ZONES

This next section will help you consider a few items that can give you that “at one” feeling with your bike. There are really just 3 spots where body meets machine: handlebar grips, saddle, and pedals.

Handlebar grips 

Before we talk about bar grips you should understand the two basic classes of grips. There are the lock-on types that are gaining popularity and the conventional style that holds onto the bar with friction. The difference? About $15.00. Seriously though, the new locking grips do work a bit better because they don’t slip and are easily removed and installed using an allen key to tighten.

Saying all that, there many MTB grip choices on the market today. When choosing consider a few things: What is your riding style? Are you an epic kinda person who will spend hours on the bike or are you a DH / FR type who needs maximum grip?

picture-19

Pedal and cleat positions

Setting up your cleats is probably (in my opinion) the second most important fitting task. After all, the wrong positioning will increase strain in the knee and results in a less-than-ideal pedal stroke. Ideally you want the cleat set up so that if you draw a line from the center of the pedal axle up it will intersect with the widest part of your foot (where you apply the most force).

fitting9

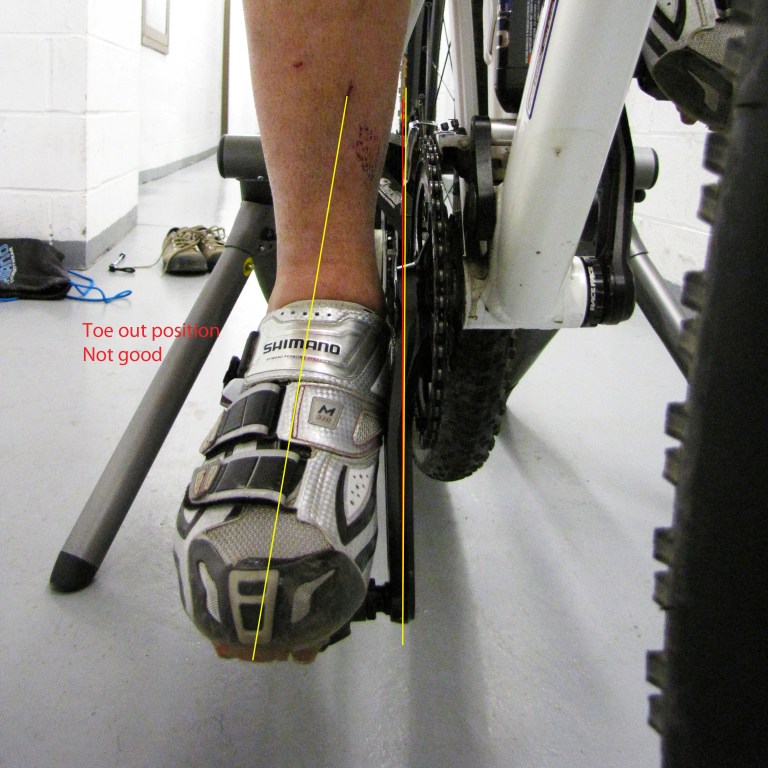
Use a mirror to take a look at the front of your feet and make sure they run parallel with your crank arms. This position will ease the load on your knee and ensures your feet will release from the pedals. One final note: many pedals feature adjustable tension and it’s often a good idea to start with the lightest tension where your feet barely wiggle (float). What you don’t want is a super solid feel to the pedal-shoe interface that hinders your foot’s natural tendency to twist on the back stroke.

fitting12fitting10fitting11

Saddle 

Selecting the right MTB saddle depends on a few things. For one, consider the type of riding you’ll be doing: racing, long epic rides, DH, etc. Do you need extra padding because your current saddle is killing you?

Aside from padding and support, take a look at saddle width. In short, your pelvic bone should match up to the widest part of the saddle. So if a saddle feels good, it’s probably the proper size for you.

This is by no means a definitive article on bike fitting but it’s based on years of personal experience fitting myself and others on their bikes. If you have question feel free to ask and I can clarify further as there are many more variables that can change a measurement or two in relationship to what was mentioned in this article.

A quick thanks to the good folks at OPUS for the sizing chart.

Cheers!